SolidWorks is a popular CAD program. The latest version, SW2008 released in September , has several new features and a new look. This article continues the overview of the new layout of the “View” section of the menu – dealing with Section creation and display options.
Introduction
SolidWorks is a popular CAD program, that is used by many engineers and designers . SW2008, the program’s latest version, has been given a new look in order to make the 3D modeling process easier both for experienced and new users. The “View” menu section is now visible constantly, giving you better control over the presented model both during the sketch phase , the feature phase and editing phase. After reviewing the “Sketch” procedure and entities , we continue our analysis of the new View menu – this article is about Section View and Display Options.
The view menu
As it was mentioned, the view menu includes:
- Zooming (zoom to fit, box zoom)
- Previous view
- Section view
- View Orientation
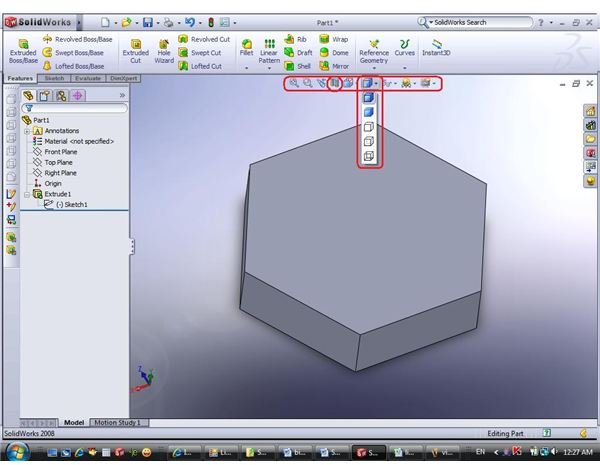
- Display style
- Show/Hide options
- Photoworks options
- View Settings
Zoom, Previous view and View orientation were discussed in previous article. The rest is covered below.
Display options
There are 5 different display options in SolidWorks:
- Wireframe – this option shows all the lines of the model, including “hidden” lines (those that are “behind” model panes”). The view is mainly a tribute to the history of CAD programs that started without the “solid” modeling at all. Also, this view can be useful for defining relations (will be covered in the following articles), especially in assemblies.
- Hidden Lines Visible – this view is very close to the Wireframe view, but the hidden lines are shown by different color (as “faded”).
- Hidden Lines Removed – This view shows only the lines and edges that can be visible form current model view and are not hidden behind the model.
- Shaded – the most “realistic” view that can take full advantage of defined lights and background scenarios (will be covered in future articles), especially with Photoworks included and active.
- Shaded with edges – the most common view that shows the solid model as it look, burt provides CAD perspective adding edges of the model – to ease the modeling/editing process.
Perspective and Shadow
This option lets you to toggle perspective and shadows on and off for the shaded mode.
Section view
In SolidWorks 2008 you should take advantage of the section views as it is very easy.
Once you press the section view button, you are taken into Section view options (in the left of your screen, replacing the Feature Tree). In this stage you must select a plane that will “slice” the model and the side that will be visible. The default is one of the 3 main planes (Top, Right, Front), but you can also select a user-defined plane. Alternatively, you can first select a plane and then hit the “Section view” button – in this case your selected plane will be the “slicer”.
You can move the slicing plane back and forth to check the model “hidden” features and also rotate it to get the exact cut that you need.
You can also perform multiple sections, using several (non-parallel) planes.
This post is part of the series: CAD modelling with SolidWorks 2008
Are you a CAD user? An engineer? Product designer? What software do you use? Try SolidWorks - and you may never want to switch back… Already a SW user? This series will give you some useful tips about the latest version, SolidWorks 2008.
- CAD software - SolidWorks 2008 Overview
- Learning SolidWorks 2008 – Creating New Part and Menu Structure
- Learning SolidWorks 2008 – Creating a sketch
- Learning SolidWorks 2008 – Sketch Entities – Part I
- Learning SolidWorks 2008 – Sketch Entities – Part II
- Learning SolidWorks 2008 – Sketch Entities – Part III
- What’s new in SolidWorks 2008 – The view menu – part I
- What’s new in SolidWorks 2008 – The view menu – part II
- Learn SolidWorks 2008 – Extrude – part I
- Learn SolidWorks 2008 – Extrude – Part II
- Learn SolidWorks 2008 – Extrude – Part III
- Learn SolidWorks 2008 – Extrude – Part IV