SolidWorks is a popular CAD program. The latest version, SW2008 released in September , has several new features and a new look. This article is an overview of the most basic feature (the Extrude) – describing the feature in general and giving basic overview of its options.
Introduction
SolidWorks is a popular CAD program that is used by many engineers and designers . Although SW2009 has been announced lately, the programs previous version, SolidWorks 2008, is the one we are dealing this. The are 2 reasons for that – not many users have already upgraded to SolidWorks 2009 and also it is the 2008 version that has been given a new look in order to make the 3D modeling process easier both for experienced and new users. After the sketch phase has been described - including the “Sketch” procedure and entities – and the constantly visible View menu covered, we continue our analysis of the program features, starting with the Extrude.
Extrude Feature
Extrude is the very basic feature of any CAD program – and SW is no exception. Its purpose is to create a prism from certain contour – “driving” it orthogonally to its plane. The contour can be relatively simple (like a circle which will create a cylinder) or complex – but it always has 2 “covers” (top and bottom) which are exactly the same.
Extrude in SW2008
Although no significant novelties were introduced to previous, SW2007 version we will cover the feature from the very beginning. As it was said, it is always advisable to start your modeling with creating a sketch – although sketch creation is always possible after you decide which feature you are going to use. After you have constructed a sketch - just click on it and choose “Extrude” for features tab. Alternatively, hit “Extrude” on the features tab and choose the sketch when asked for a plane/sketch to extrude from. If you haven’t constructed a sketch that you want to extrude– choose one of existing planes/panes either by clicking on the model or by selecting from the feature menu.
Images
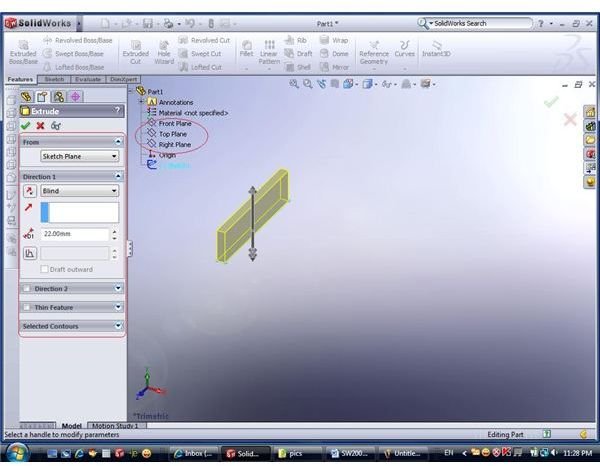
Extrude options
Once you select “Extrude” from features tab, a menu will open on the right of your screen, which includes several choices:
- From (where to start your extrusion)
- Direction 1 – the side and length of your extrude
- Direction 2 – optionally “extruding” your contour to 2 sides of the sketch plane
- Thin feature – a possibility to create a “thin-walled” prism instead of solid prism
- Selected contours – adding/removing sketches that are subject to the Extrude procedure
Each of those options will be dealt with in the next article, providing a complete overview of the Extrude options.
This post is part of the series: CAD modelling with SolidWorks 2008
Are you a CAD user? An engineer? Product designer? What software do you use? Try SolidWorks - and you may never want to switch back… Already a SW user? This series will give you some useful tips about the latest version, SolidWorks 2008.
- CAD software - SolidWorks 2008 Overview
- Learning SolidWorks 2008 – Creating New Part and Menu Structure
- Learning SolidWorks 2008 – Creating a sketch
- Learning SolidWorks 2008 – Sketch Entities – Part I
- Learning SolidWorks 2008 – Sketch Entities – Part II
- Learning SolidWorks 2008 – Sketch Entities – Part III
- What’s new in SolidWorks 2008 – The view menu – part I
- What’s new in SolidWorks 2008 – The view menu – part II
- Learn SolidWorks 2008 – Extrude – part I
- Learn SolidWorks 2008 – Extrude – Part II
- Learn SolidWorks 2008 – Extrude – Part III
- Learn SolidWorks 2008 – Extrude – Part IV