This Pro Engineer Mechanica or ProE Mechanica tutorial will discuss applying loads and applying boundary conditions. In this part of the tutorial, you will learn how to create an analysis in Pro-Mechanica.
Analysis & Design Study Window
The previous part of this ProE mechanica tutorial has tought you about creating pro-mechanica geometry, in this part of the pro engineer mechanica tutorial, you will learn to use analysis and design studies.
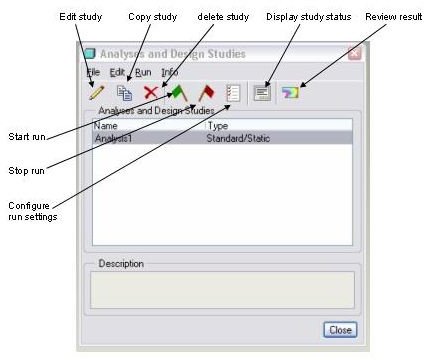
Select run a design study or go to analysis > mechanica analysis /studies to open the analysis and design study window, here you will get all the commands to do analysis, convergence as well as post processing.
Refer the attached picture, the functions of all the buttons has been decried over there. You can use these buttons as well as the options available to the pull down menus at the top row (file, edit etc.) to perform analysis.
New Static Analysis
To start a new static analysis select File>new static and it will open the static analysis definition dialogue box:
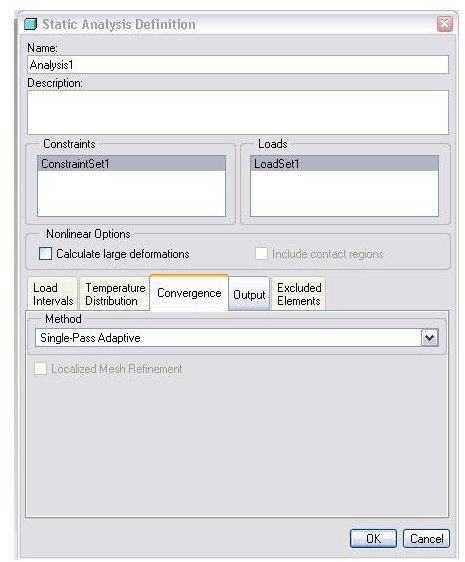
Name: You have to provide a name of the analysis at the name field, Please note that giving a meaningful name is important as by this name a subdirectory will be created and all the result files will be stored there, also while you will view the results of the analysis you will be required to use this name.
Description: You may or may not enter a description of the analysis in this field.
Constraints: here you have to select one or more constraint sets for your analysis. Remember you have defined the constraint sets while defining the constraints. You will see all the constraints sets, which you have defined earlier in this field.
Loads: Select the desired load set/sets, which you want to see the result for.
Convergence: Convergence is the method by which FEA software reaches sufficiently close to the iterative solution with specified accuracy. Pro mechanica uses P-method for convergence, this method allows pro mechanica to monitor the solution and accordingly modify the polynomial edge order until a solution with specified accuracy is achieved.
Convergence can be implemented with three options in pro mechanica:
-
Quick Check: This is actually not a convergence method because the model is run only for a single fixed (low, usually 3) polynomial order. The output from the quick check should not be considered as the result of the FEA. Quick check is only to see whether the model is totally error free to perform further convergence methods.
-
Single Pass Adaptive (SPA): SPA runs one pass at a low polynomial level and modifies the p-level of the problem elements to run final pass. SPA is recommended for a huge model and/or very well-behaved model. If you want further verification of convergence then you can opt for MPA.
-
Multi Pass Adaptive (MPA): Multiple p-loop passes are made through the solver with the edge order of the problem elements being increased by one or two with each pass. This iterative approach continues till the specified accuracy is reached or maximum specified edge order (default 6, maximum 9) has been reached.
After you choose the right convergence option click ‘OK’ and you will return to the analysis and design studies window.
Next thing you have to do is to click on the icon with “green flag” and is named “start run” now click yes on “do you want error detection?”
Now you click on the display study status, the run status window will be opened and show whether the run is still on or completed.
Review Results
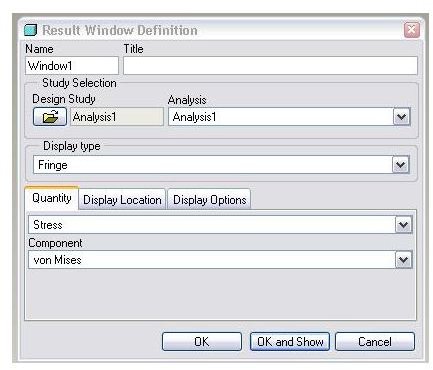
By this time, I am sure you are excited to see you FEA result! Click on the right most icon (review result of design study) of the analysis and design study dialogue box and it will open the result window definition dialogue box as below:
You have to select name of the design study, display type (like, fringe, graph etc), display quantity (like, stress, displacements etc.) and display option (like, types of contour, animation, legend type etc.). Then you click on OK and Show button to see the result.
The “analysis and design study” options are most important to run an anylysis and postprocessign in Pro engineer mechanica. The options discussed in this pro mechanica tutorial are only partial, you can always explore further.
This post is part of the series: Pro-Mechanica Tutorial
Pro-mechanica is a FEA module of pro-engineer. If you complete reading this series and do practice as required then you will be able to do analysis using pro-mechanica, of course you should have basic knowledge of pro-engineer or other 3D cad package.
- Pro-Mechanica Tutorial Part 1: Introduction to FEA
- Pro-Mechanica Tutorial Part 2: AutoGEM & Meshing
- Pro-Mechanica Tutorial Part 3: Structural Loads
- Pro-Mechanica Tutorial Part 4: Thermal Loads
- Pro-Mechanica Tutorial Part 5: Thermal Constraints
- Pro-Mechanica Tutorial Part 6: Structural Constraints
- Pro Engineer Mechanica Tutorial Part 7: Analysis and Design Studies
- Pro-Mechanica Tutorial Part 8: Reviewing FEA Results