The proposed mini-electricity generator project is very simple to build and can be used by students as a school project, or just for hobbyists. The set up can be used to charge a battery with electricity produced from wind power.
A dynamo is a type of alternator commonly associated with bicycles for generating electricity that is used for lighting a small head lamp. The unit eliminates the need of a battery and provides an easy alternative for illuminating a lamp whenever the bicycle is in motion.
A dynamo is a pretty interesting little generator which starts generating pure electricity the moment its wheel is rotated. Basically, it works on the fundamental principles of electromagnetism where current is induced in coils of copper wire under the influence of a rotating magnetic flux, generated by alternate shifting of the magnets North and south poles.
Before we move on to the actual project, interested enthusiasts may try building a homemade dynamo with the help of the explanation provided in the following section.
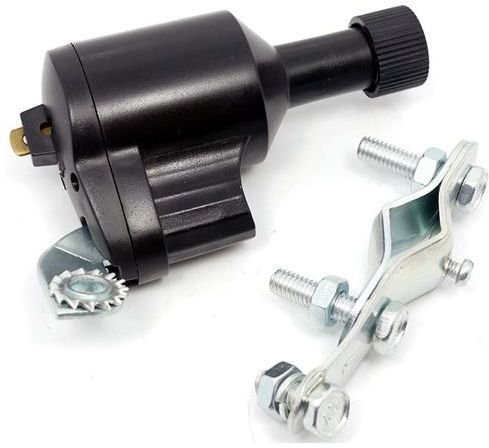
Image Credit - https://www.seeedstudio.com/depot/bicycle-dynamo-with-bracket-6v-3w-p-798.html
How to Make a Homemade Dynamo
You will need the following materials:
- A flat iron bar = six inches long, half mm in thickness,
- Super enameled copper wire = 28 to 30 SWG, 25 meters approximately,
- Small magnet bar = square in shape, 1.5 square inch, half mm in thickness.
- Suitable spindle, clamp, wheel mechanism set-up as discussed in the text and in the diagram.
- Torch Bulb = 3 Volts
Procedure:
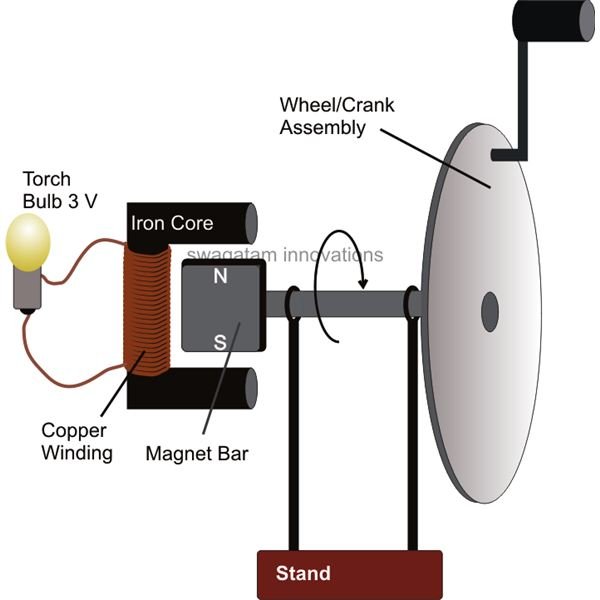
Bend the iron bar in “U” shape with dimensions as shown in the diagram.
Cover the horizontal portion of the “U” with a reasonably thick paper former or insulate it with some kind of PVC tape.
Wind the copper wire neatly and gently over the above dressed section of the “U” channel, through uniform overlapping steps, until you have at least 6 inches of wire ends left for external connections.
Take the magnet and fix it (by gluing or some other suitable method) over a central metal rod and arrange the mechanism just as directed in the diagram.
Connect the coil ends to a small 3 volt torch bulb.
Now it’s just a matter of rotating the central rod/magnet assembly as fast as the mechanism permits.
If the winding and the mechanism specifications are perfectly optimized, it will instantly produce a nice glow over the filament of the bulb.
Your homemade DIY dynamo is ready.
However, the above make cannot be even close to a readymade dynamo as far as efficiency is concerned, so for our next main project, we would want to procure a good quality readymade bicycle dynamo.
Construction Clues
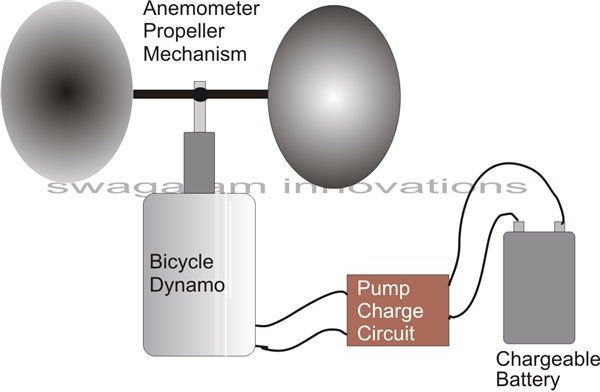
In one of my previous articles we discussed the construction of a windmill generator using an ordinary motor. In the article I recommended the use of the anemometer principle while designing the propellers. The reason behind this was to avoid the inclusion of cumbersome rudders and complicated pivot mechanism. The propellers associated with anemometers do not depend on wind directions and are capable of producing consistent, unidirectional, high speed revolutions under most wind conditions.
Although the use of a stepper motor has an advantage of driving the load (charging batteries) directly, without the need of an external circuit, the device is costly and requires higher wind speeds for optimum saturating levels. Moreover, new electronic enthusiasts often get confused with the specifications while procuring them.
Here, the use of a bicycle dynamo makes the procedures very simple, however since the unit generates electricity at relatively lower levels, it may require an external voltage booster circuit for driving a load consistently. In the present application we are able to use the generated voltage for charging many Ni-Cd cells (1.2 V each) in series.
The mechanical set up illustrated in the diagram is self-explanatory and quite simple to construct. As per the law of the moment of inertia, longer propeller shafts will help to generate greater torque and consequently higher currents from the dynamo.
Practically though, you will find, only at optimum speeds, the generator produces voltages above 4 volts. Therefore, in order to get this voltage, which is ideally suited for the application even during dull wind speeds, we will require a voltage booster circuit or what is popularly know as the “charge pump” circuit.
The Charge Pump Circuit
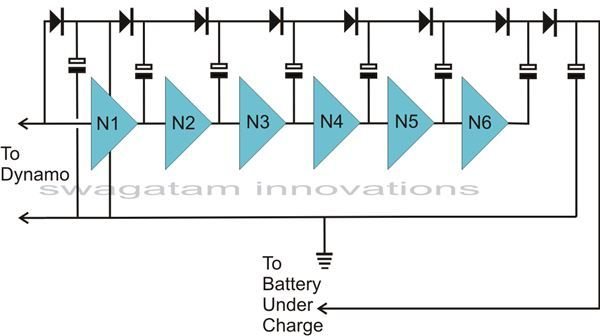
The simple charge pump circuit shown here is simplicity in itself. By interconnecting six NOT gates or CMOS inverters, in the way shown in the diagram, you can boost any voltage at its input to more than twice the level at its output.
Now it’s all about fixing the stages in order and acquiring the required results.
Parts Required
You will need the following parts for making this wind mill dynamo circuit:
- All capacitors are 22 µF / 25 V,
- All diodes are 1N4007,
- The six NOT gates are from the IC 4049,
- Dynamo is 6 V, 3 Watts, standard bicycle dynamo.
- Cup and spindle mechanism as given in the diagram.
References
- Authors own experience.
- Images - Drawn by the author


