Looking for an easy, DIY project to try? You’ll be surprised by how easy it is to wire your own doorbell. Follow this simple tutorial.
A door bell, as we all know, is basically an electrical or electronic device used as an audible indicator. This is considered an essential home appliance through which a visitor is able to make known his or her presence by pressing a button on the outside of the home. This has become an indispensible piece of equipment.
Door bells are available plentifully in the market in different sizes, shapes and types, ranging from the most ordinary types to the highly sophisticated ones. The most basic ones may include bells in the form of buzzers which normally generate an ear-piercing, harsh buzzing sound, and the “dingdong” ones which are much more pleasant, though are usually only able to generate a fixed two-tone sound.
More interesting types may come with multi-musical outputs or may have an embedded piece of voice output making it very hi-tech. The range may further go on and include door bells which are wireless and therefore may not require the cumbersome drilling generally involved with door bell wiring. However, since wireless door bells can be expensive, we are here discussing the kind which do need wiring and are more commonly used. We’ll learn how to do it through some simple illustrations, the procedure being the same for all types discussed above.
Many houses, especially bungalows, sometimes forget to get the door bell wiring done. Instead of calling the local electrician who might be a bit reluctant in doing the rather trivial part of the whole completed wiring, you can simply do it yourself. This can be a lot of fun and a learning experience too.
Instructions
Just like any other electrical gadget, a door bell also involves very straightforward wiring.
The most basic information that one has to remember with AC electrical wiring is that the connections simply move in series joining each parameter one after the other.
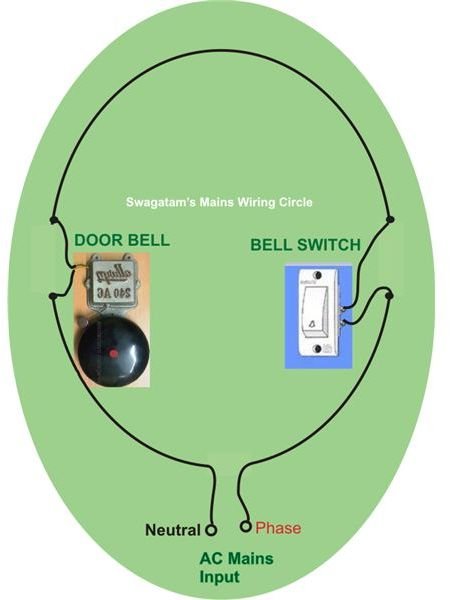
For ease of understanding let’s refer to the simple diagram shown alongside. I have named it “Swagatam’s Main Wiring Circle.”
If you can memorize the above diagram you should be able to successfully complete not only a door bell but any type of normal electrical wiring involving a switch, an appliance and the input supply voltage anywhere in the world. The door bell shown in the diagram can be replaced by either a fan, light or any other appliance to get the particular relevant wiring completed.
You can see that a door bell normally has two wires which needs mains supply voltage to operate, the bell switch also has two terminals and functions as a cut off system and stops the flow of electricity from its one terminal to the other when turned off and vice versa.
Therefore by simply connecting the shown components one after the other just as illustrated, your door bell can be wired quickly and easily.
The wiring doesn’t need to be in the shape of a circle obviously; the diagram is drawn in that way just for the sake of simplification and to enable quick grasping of the connection details. A more graphical depiction of the wiring shown below should give you an enhanced idea regarding how to wire a doorbell.
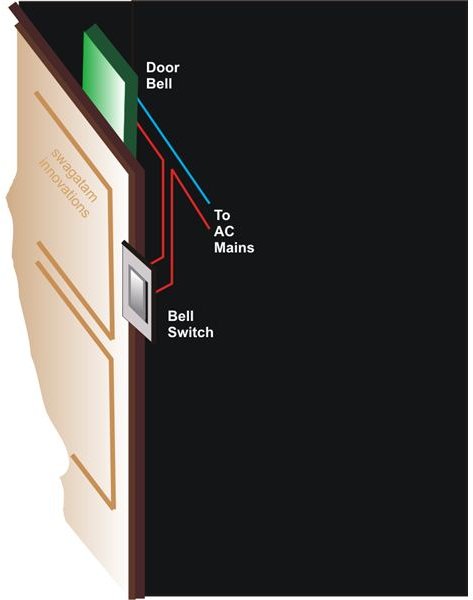
It is important to note that the entire wiring technically doesn’t have any polarity, and the inputs may be oriented any way round, however for safety concerns the phase should always go to the switch so that when power is switched off or when not in use, the appliance may be kept aloof from dangerous AC mains supply.


