
Here we discuss the complete construction details of solar powered string lights using a simple charging circuit, a few rechargeable pencil cells, and a small portable solar panel. Learn more in this easy-to-understand article about how to make your own simple solar powered string lights.
Solar cells: expose them to sunlight or in fact any light and they start producing electricity almost from nowhere. I find it miraculous that scientists could conceive of such an idea, and now ordinary folk like us can take advantage of their discoveries.
It’s not surprising at all why solar cells are getting so popular. Did you know you can even build your own lights powered by solar cells? Here I’ve produced some directions to making your own solar powered string lights. This article deals only with the technical part of the above subject. The proposed circuit will charge few a Ni-Cd cells during daytime through a portable solar panel and will automatically switch ON a set of LEDs as soon as night falls.
Solar Panel Specifications
A small portable solar panel specified for the present circuit is quite economical and will serve to provide a long life converting light into pure electricity. One similar to the panel pictured at right can be purchased at harborfreight.com .
This solar cell is to be installed outdoors (where plenty of sunlight is accessible), maybe in the garden premise or over a lawn area or the gazebo or a RV awning. But don’t bother much about direct sunlight as even under shade (during day time) the power delivered by it will be sufficient to charge the battery utilized for the present string lights.
The specifications of a sample solar panel (see figure and click to enlarge) suitable for charging four Ni-CD cells (1.2V each, total 4.8) and powering a few LEDs is provided as follows:
Maximum Voltage: 14 V (@ perpendicular sunlight),
Maximum Current: 350mA (@ perpendicular sunlight),
Maximum Power: 5 Watts (Multiplying the above parameters).
Dimensions: 12" * 18" * 1"
Although the above specifications of the solar panel allows it to be just enough for the present circuit, you may go ahead and experiment a bit by increasing the number of batteries or LEDs to increase the lighting capacity. But, in that case the above solar panel will not be able to power them up during overcast conditions and it can be used specifically only if the sunlight is perfectly optimized.
Circuit Description
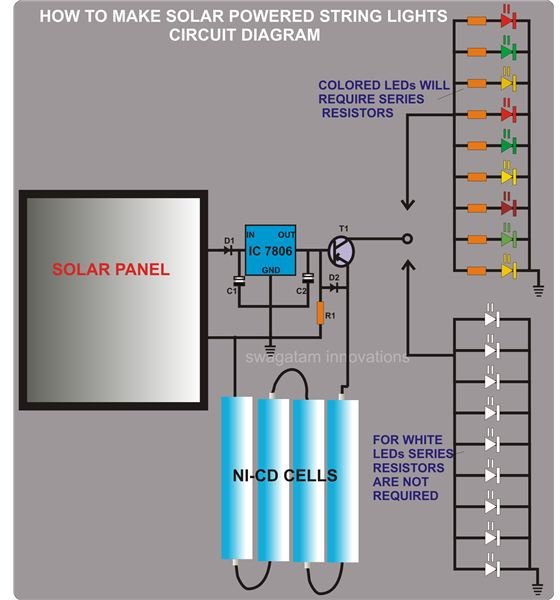
The idea of lighting a few LEDs using a solar panel may appear quite straightforward, but it is not.
As we already know, charging a battery requires proper dimensioning of the source power and it should match with the battery specifications.
Here, the addition of the voltage regulator makes it sure that its output voltage (6V) is perfectly matched to the battery voltage (4.8V - The charging voltage is always kept a little higher than the voltage of the battery under charge).
The present parameters also ensure that the circuit works smoothly even during overcast conditions or if the solar panel is not receiving incident sunlight. Because, as the maximum voltage of the solar panel is 14 volts (under full sunlight), means during shady hours it will still produce voltage at least above 5 volts, enough to operate the present circuit comfortably.
The introduction of the transistor is also crucial. We don’t want to keep the LEDs lit unnecessarily even during broad daylight, consuming power from the solar cell and slowing down the charging process. The transistor ensures that the LEDs illuminate only when the panel stops producing any electricity, i.e. when darkness falls.
Once built and integrated, the above unit should go on forever, lighting up any area you wish, every night, with absolutely no energy bills.
Parts List
You will require the following parts to make your own solar lights:
White LEDs = 8 nos. (If intended for decorative purpose, colored LEDs may be used),
Resistor (R1) 100Ω, ¼ watt, CFR = 1 no.
Resistors 33Ω, ¼ watt, CFR = 8 nos. (If colored LEDs are used)
IC 7806 = 1 no.
Diodes (D1, D2) 1N4007 = 2 nos.
Transistor (T1) 8550 = 1 no.
Capacitors (C1, C2) 10µ/16V = 2nos.
Battery 4.8V = 4nos. (1.2V each, Ni-Cd cells, connected in series),
Battery holder = 1 no.
Solar Panel as explained above.
Strip of general PCB (recommended)
How to String the LEDs?

Colored String lights commonly used during festive occasions or parties greatly help to enhance the mood and the ambiance. They also look pretty attractive and catchy. If you desire to use the present circuit for decoration purpose, you will need to connect the LEDs together through flexible wires so that they may be hung or attached or oriented anywhere as one wishes. The connection is made as follows:
Since the forward voltage drop of colored LEDs is around 2 volts, the supply voltage of 4.5 volts can be a bit too much for them to tolerate. Series resistors connected to each of the LED will restrict the current and light them up safely.
Connecting the resistors to the LED leads themself would interfere with the flexibility of the LEDs and hamper the string effect; therefore, fixing the resistors over the circuit board and connecting just the wires to the LED string from the PCB would be much cleaner and more reliable.
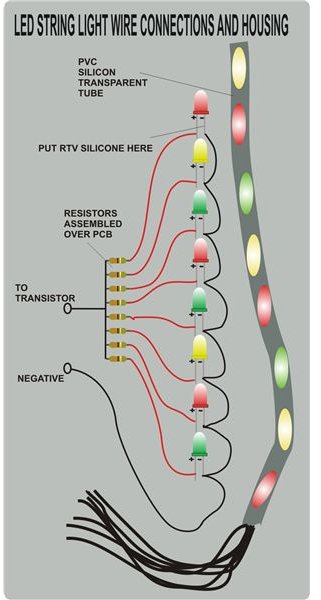
As shown in the figure alongside (click to enlarge), begin by interconnecting the LEDs together using small lengths of good quality flexible wires as illustrated.
Seal and cover the wire joint at the base of each LED using RTV silicone glue. Let it dry for a few hours until it solidifies.
In view of safeguarding the LED string from dust, moisture and mechanical shocks, it would be important to enclose it in some kind of flexible and transparent housing.
The tubes used in bikes for transferring petrol from the tank to the engine is perhaps best suited for the purpose, or any other type of PVC pipe will also do as per your own choice. Insert the whole LED string into the procured tubing appropriately without breaking the wiring and allowing only the connecting wires to come out from one end of the tube. Seal the other end using two-compound glue.
Building the Main Circuit Board
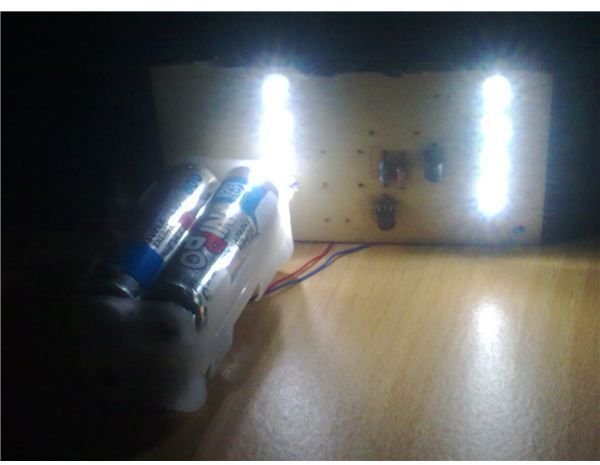
If you intend to use the circuit solely for lighting up a particular dark corner of your house like a passage, corridor, garage, gates etc., then using white LEDs instead of colored ones would help in a much better way. Use of a base like a PCB is recommended for ease of assembly and installation. Do it the following way with the help of the circuit schematic provided on the first page:
-
In a strip of general PCB (size as you desire), insert the white LEDs so that they are all in a straight line. This orientation will ease up connecting them together.
-
Pressing them firmly over the PCB, join by bending and soldering all the negatives leads together, i.e. connect them to make a common connection.
-
Similarly, bend and solder all the positive leads together to produce a single common positive.
-
Remember, we are not using series resistors with the white LEDs here, since the supply is almost equal to the LED’s (white) forward voltage drop. If colored LEDs like red or green are used then you will have to connect a 33 Ohms resistor in series with each LED and then common up the free ends of the resistors to produce the required single positive supply end (as discussed and illustrated in the previous section).
-
After this, insert all the other components suitably at one end of the PCB and interconnect them as shown in the circuit diagram.
-
Finally, connect the PCB assembly to the solar panel using flexible wires - the length will depend on how far the solar panel is situated from the LED circuit assembly.
Have further doubts regarding how to make your own solar lights? You may wish to contact me at my blog .


