GD&T Tutorial – Assembly Tolerance Chain Stack Up Analysis
All the machining process produces the components within certain amount of tolerance to its desired dimensions. As the precision of the machining process increases, the tolerance gets reduced, but no practical machine can produce components with zero tolerance. Due to this tolerance only, the concept of MMS, LMS and bonus tolerance is developed.
The situation become even more complicated when multiple components with different tolerances form an assembly. For such an assembly, what will be the tolerance? How to calculate the whole assembly tolerance? Assembly tolerance chain analysis or tolerance stack up analysis is the answer.
What is Assembly Tolerance Stack up Analysis?
In short, assembly tolerance stack up analysis will tell you the tolerance value of the whole assembly or a specific gap of the assembly when you know the tolerance values of all its components.
Assembly tolerance chain stack up analysis can be performed in many ways. The simplest method is the worst case method, which we are going to discuss here.
Worst Case Method of Assembly Tolerance Stack Up
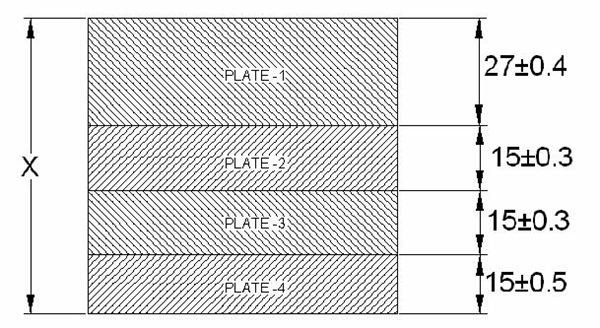
Say, we have an assembly of four thick plates like below:
The thickness and tolerance of the four plates are shown in the above figure. We have to find out the dimension “X” and its tolerance value. Proceed as below:
- Calculate the lower specification limit (LSL)size for each of the plates like below:
For PLATE-1:
LSL= 27-0.4 = 26.6
For PLATE-2:
LSL= 15-0.3 = 14.7
For PLATE-3:
LSL= 15-0.3 = 14.7
For PLATE-4:
LSL= 15-0.5 = 14.5
- Sum up the LSL thickness values of all the plates, and you will get the LSL thickness of the whole assembly as below:
TL = 26.6 +14.7 + 14.7 + 14.5 = 70.5
- Calculate the upper specification limit (USL)size for each of the plates like below:
For PLATE-1:
USL= 27+0.4 = 27.4
For PLATE-2:
USL= 15+0.3 = 15.3
For PLATE-3:
USL= 15+0.3 = 15.3
For PLATE-4:
USL= 15+0.5 = 15.5
- Sum up the USL thickness values of all the plates, you will get the USL of the whole assembly as below:
TU = 27.4 + 15.3 + 15.3 + 15.5 = 73.5
- Tolerance of the whole assembly can obtained as:
± (TU – TL) / 2 = ± (73.5-70.5)/2 = ± 1.5
- Sum up the nominal thickness dimensions of all the plates to get the nominal thickness value of the whole assembly, like below:
TN = 27 + 15 + 15 + 15 = 72
- So, by the worst case method we got the overall dimension (X) of the assembly as:
X = 72 ± 1.5
Conclusion
Assembly tolerance chain stack up analysis is used for calculating the tolerance value of the overall assembly (or a gap in the assembly) from the tolerance values of the individual components. The worst case method of the stack up analysis is the simplest among all the methods used in industry.
Related Readings
**GD&T Tutorial on Projected Tolerance:**This geometric dimensioning and tolerancing or GD&T tutorial will discuss projected tolerance and its application and benefits for preparing engineering drawings.
