In this turbo cad tutorial we will discuss few frequently used handy turbo cad operations.
Turbo cad is a powerful cad tool with 2D and 3D capabilities. It is better to have some idea of the basic turbo cad operations discussed in the basic turbo cad tutorial before reading this advanced article.
Constraints
This is an amazing feature of turbo cad. Actually the concepts of constraints are used widely for creating sketch in 3D cad packages like ProE, Unigraphics etc. You can find the different types of turbo cad constraints at Format → Constraints. There are total of eighteen types of constraints available in turbo cad. In short, constraints are used to modify the geometry based on there geometric inter-relations. Some of the constraints are discussed below:
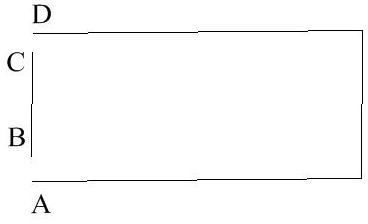
Coincident: By using this constraint you can coincide two points or entities.
In the above picture, let’s say you have to connect the point A with point B and the point C with the point D. You go to Format→constraints→coincident, you will see the instruction as “select the first element to add constraint” and you click the point A now you will see the instruction “select the second element to add constraint”, now select the point B and that’s it. See how the two points has coincided together.
Similarly, you can coincide the points C and D.
Please not that, turbo cad communicates all the instructions displayed at the bottom left corner of the GUI.
Parallel: For making two geometric entities parallel, you need to use this constraint.
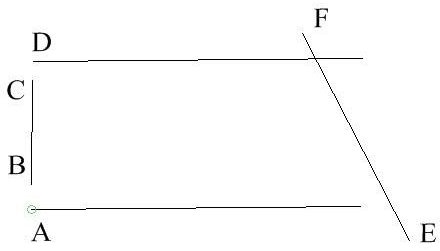
Say you need to have the lines BC and EF parallel as your design requirement then go to Format→constraints→parallel and select the two lines following the turbo cad instructions.
Once you understood the above two constraints, the remaining constraints you can understand by your own.
Snap
Snaps are kind of magnetic points of your drawing entities by which your cursor get attracted. How is it helpful? Say, you have activated mid point snap, now if you need to draw a line from the mid point of a line the you can simple put your cursor somewhere near the midpoint and it will automatically pick the actual mid point as the first point of the line.
You can activate the different types of snap options from: Modes→snaps. To get an idea about working with snap, let’s discuss the intersect snap:
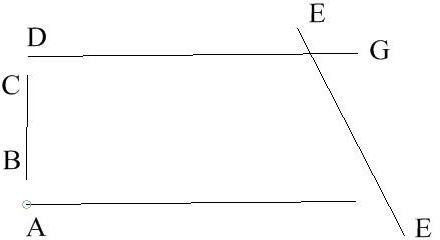
Now if you need to draw a line just from the intersection point of the line DG and EF then activate the intersection snap by Modes→snaps→intersection and then click the Line icon. Now, as soon as you bring your cursor near the intersection you will feel the attraction and if you click there it will pick the exact intersection point as the starting point of the line.
You can try the other snap options by yourself.
Conclusion
The turbo cad tutorial here discusses two advanced operations: constraints and snap. Knowing these operations is useful for speeding up your drawing creation process. Moreover, I recommend you to notice and apply the shortcut command shown near some of the operations for graduating to professional level.