Layers are very important for managing AutoCAD drawings, especially for huge architectural and electrical drawings. AutoCAD 2009 has many tools to control layer objects.
Layers are used to group similar kinds of AutoCAD drawing entities. If you have seen an AutoCAD drawing of a large building or electrical cable layout of a power plant, then you must have realized that without using layers you cannot even read the drawings. Before going to details about layers, I should tell you that every AutoCAD drawing must contains at least one layer (layer 0) which cannot be deleted. You may create your drawing without any additional layers, but it is always better to create layers whenever required.
Benefits of using layers in AutoCAD drawings
In short, layers will give you more options to control the appearance, editing, and plotting of the drawing entities. You can control the followings:
- Whether objects of any layer should be visible or not.
- Whether objects of any layer should be plotted or not.
- How the lines will appear and be plotted.
- Whether objects of any layer should be editable or not.
Getting started with layers in AutoCAD 2009
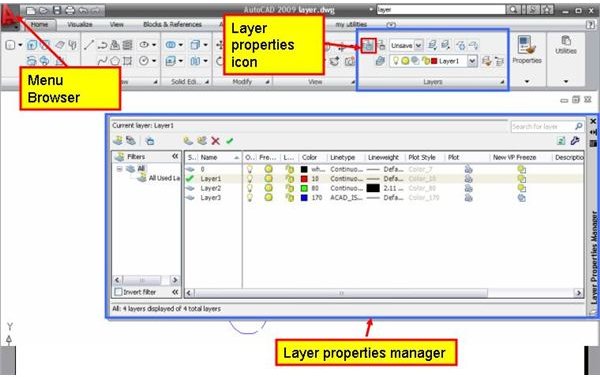
See the below snap (click on it to enlarge):
Type layer in the command line or click on the layer properties icon to get the Layer Properties Manager dialog box as seen at left. Initially you will get only one layer (layer 0).
To create an additional layer, click the “New Layer” icon of the Layer Properties Manager dialog box or alternatively press Alt + N.
AutoCAD will name every newly created layer like Layer 1, Layer 2, and so on; you can rename them by double clicking the name. You can use any characters and numbers except < > / \ “: ; ? * | = ‘
You will see the following major tabs will be there for each of the layers:
- Status: This tab displays status of the layer. A green tick mark indicates the current layer. To make any layer current, just double click the respective status icon. Fresh drawing entities you will be created will get the current layer properties.
- Name: We have already discussed about this tab, this is the name of the layer.
- On: By toggling the icon under this tab, you will show/hide (on/off) the drawing entities of the layer.
- Freeze: By toggling this button also you can show/hide (freeze/unfreeze) objects of your desired layers.
Difference between off and freeze: If you turn off any objects it can still hide the objects under it, but if you freeze any objects it will not hide any other objects under it. Freeze/Unfreeze takes more time than on/off.
- Lock: This button is the lock/unlock toggle. By locking a layer you can protect the objects of it from editing.
- Color: Default color of the objects of a layer could be set from here.
- Linetype: From here, you can set the default linetype of objects of a layer.
- Lineweight: What the thickness of line you want while plotting is set from here.
- Plot: By toggling the icon under this tab, you will set whether objects of a layer are printable or not.
When you are creating a fresh drawing, plan the layers, and set the required tabs. Then “set current” the required layer and draw the objects.
By using layers, AutoCAD drawings become more organized. Layers help to easily control the appearance, visibility, editing, and plotting of the drawing.