Breakdown and Repair of Marine Diesel Engines at Sea
Introduction: Breakdown and Repair of Ships Main Engine at Sea
Part of a ships engineer’s responsibility is to repair the main engine when it breaks down at sea. This can be a simple repair such as changing a defective fuel valve to a more time-consuming job such as changing a piston or cylinder liner.
Whatever the nature of the repair required, it must be carried out as expediently as possible, as the ship is in a dangerous situation especially if in a busy shipping lane.
This is an article about repairing the ship’s main engine on a general cargo vessel whilst at sea. We begin with a brief description of the ship’s Sulzer main engine, then move onto the diagnosis and repairs carried out on it.
General Description of a Sulzer Marine Diesel Engine and Key Component Locations
I have sailed as watch keeping engineer on many marine engines, both steam and motor, and although I served my apprenticeship at Harland & Wolff Belfast who built B & W engines, I prefer the Sulzer RD engine to any other. They are turbocharged, two-stroke crosshead engines, running on diesel oil when maneuvering and on heavy oil when at sea.
The top platform of the engine contains the cylinder heads; the next platform down is the turbo blowers operated by the in-line rotating exhaust valve.
The scavenge doors and fuel pumps are located at the other side of the engine at this level, which drops down to the bottom plates and the control station.
Scavenge Fire
I was awakened by the sound of the main engine slowing down accompanied by the battering on my cabin door, the greaser popping his head around the door announcing to half the alleyway, “Scavenge fire No. 1, again.”
On reaching the control station, I met up with the Chief and Fourth engineer who were slowing the engine down further. The Chief sent me up to the fuel pumps where I lifted No. 1 supply pump off its cam, effectively shutting the fuel off the cylinder, and I could see the Fourth below me pumping lube-oil by hand into No. 1 Cylinder to increase the oil flow and prevent piston seizure.
The Chief eventually stopped the engine and the Fourth and I slotted in the turning gear, whilst the Chief was on the phone to the bridge.
He called us over for a confab, and explained that the Captain and he had decided since this was the third scavenge fire in four days, and in the same cylinder, we would have to investigate the cause.
The Captain had advised the Chief that now was an ideal time to do this as we were well away from the coast and the weather was good, with just a little swell.
Scavenge fires are quite dangerous, if not acted upon quickly and correctly. They are usually caused by a build-up of oil in the scavenge space, which is ignited by a spark passing the piston rings, and the Chief suspected the piston rings were worn or broken.
Removal of Piston for Ring Inspection
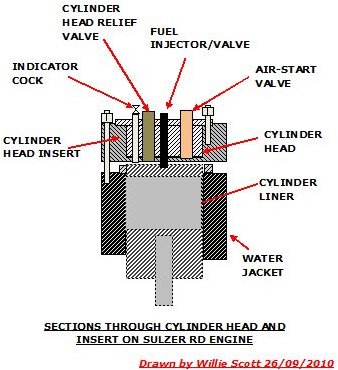
We had to do quite a bit of stripping to examine the piston rings and confirm the Chief’s suspicions of broken rings, so we started by opening the main engine door on No.1 unit and the scavenge doors letting the engine cool down whilst we gathered together the gear for lifting out the piston. We were soon ready to start stripping the cylinder head and insert. This was accomplished by removing all the pipe-work from the cylinder head components; we used to remove the fuel valve, relief valve, indicator cock and air-start valve as well. However, the Chief had made up a metal frame which held a spare cylinder head, complete with all the overhauled components. This was then ready to replace the old one, and saved a lot of time, the old cylinder head being overhauled at our leisure.
The cylinder head is fitted to the insert by nuts on studs and once the nuts were removed, lifted off using the overhead crane. The insert was then lifted clear after removing the nuts from the long studs screwed into the cylinder jacket_._
Meanwhile I was in the crankcase, having clambered up to the crosshead bearing, and was disconnecting the piston rod nut, using hydraulic tensioning gear. The piston cooling pipes were then disconnected leaving the piston ready for removal and inspection.
The greasers had also been busy cleaning out the scavenge space and the carbon deposits around the exhaust ports.
Back on the top-plates the boys had the piston ready for removal having scraped away the carbon ring deposit left around the top of the liner by combustion; this would otherwise impede the removal of the piston.
An eyebolt was screwed into the top of the piston and slings attached to this and the overhead crane.
I went back to the crankcase and as the piston was removed, guided the piston rod through the crosshead bearing watching for possible thread damage before going to the scavenge to guide the rod through the piston rod gland.
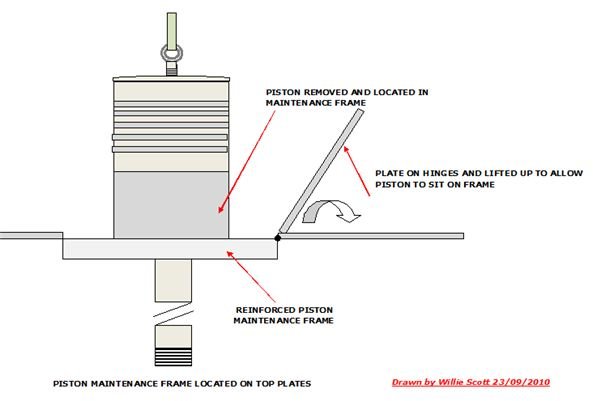
Once clear of the engine the piston was landed in the maintenance support frame, a section of plate being lifted to allow it to pass through the top plates, giving us access to the rings.
Inspection and Replacement of Piston Rings
Well, it was easy to see why the combustion sparks were setting fire to the scavenge oil: a small piece of one of the bottom rings was missing and the rest of the rings were “sticky” in their grooves and showed little sign of lubrication.
This indicated poor fitting between the rings and the grooves in the piston allowing “blow by.”
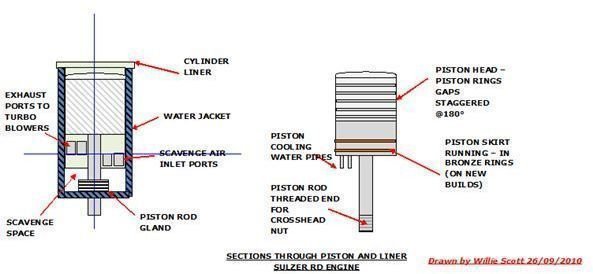
Sulzer engines piston rings are machined slightly oval, so when running at normal temperatures would transform to a circular form, pressing firmly against the cylinder walls. To reduce wear, the piston ring grooves are chrome plated on their lower landings.
The new rings were fitted using a special ring expander and the ring clearances were checked between the piston grooves and the rings and the liner checked for wear and ovality, and all were within the Sulzer recommended tolerances. The piston was then rigged for refitting and lifted off the maintenance stand.
A tapered conical ring-piece is set into the top of the liner and this compresses the rings as the piston is lowered into the liner, preventing any rings from catching on the entrance to the liner edge and breaking.
I was in the crosshead bearing again after guiding the piston rod through the scavenge gland, I now guided it through the crosshead bearing, screwed on the nut and hydraulically tensioned it, witnessed by the Chief Engineer.
The piston cooling pipes and couplings were reconnected and as the rest of the engineers fitted the insert and overhauled cylinder head, whilst I renewed the scraper rings in the piston rod gland. These were in sections, held together with springs and consisted of a set of top rings preventing scavenge oil/air from entering the sump and a bottom set of rings preventing lube-oil splashing up from the sump area, entering the scavenge space.
The scavenge space was given a final inspection and I refitted the door and opened up the drain valves to the dirty-oil tank.
Up top, the rest of the boys had refitted the cylinder head and piping so we opened and bled the fuel valve tidied away the tools whilst the Chief and Second went down below to start the engine, leaving me up top to ensure all was well with the repaired components.
I heard the engine room telegraph ringing, then the Chief gave her a good blow through on air and I shut the indicator cocks.
The next blast of air was accompanied by a safety valve lifting, then the engine settled down to a comfortable half speed, the Chief gradually increasing the revs and the Fourth and I watching exhaust and cylinder head cooling temperatures.
After about half an hour, everything had settled down and the Second and I went up for a breather and a shower, before I went down to take over from the Chief.
We completed the voyage without any further scavenge fires, and had a telegram form head office congratulating us on one of the fastest piston-ring changes and recommending we check the rest of the pistons whilst in ports up in the Great Lakes, and the Captain sent down a case of beer between us.
Sketches of Diesel Marine Engine Components Following Breakdown and Repair at Sea.