How to Make Your Own Highly Efficient LED Light Fixture
The popularity of modern high efficiency white LEDs have grown immensely in the recent past. The reason behind the popularity is due to some vital advantages associated with these devices.
White LEDs are able to produce eye-blinding light intensities using amazingly low power supply inputs. The light produced from white LEDs is milk-white in color which is gentle and gives a soothing effect to the eyes, and becomes ideal for reading purposes. Moreover these lamps are small, unbreakable, weather proof and as discussed above are highly efficient with their performance.
LEDs can be used as single units or can be made into groups to any extent, thus the application using LEDs as lamps offers a wide range as far as light and power selection are concerned.
A single LED can be used to make a small decorative electronic candle, a group of 10 LEDs produces enough light for illuminating corridors, stairways and for small table lamps, LED lamps incorporating within a hundred LEDs become suitable for small home lighting purposes and in this way we can go on increasing the individual units for illuminations as per requirements or as per our personal preferences.
White LED lamps are also being used for high intensity light applications like automobile headlights, and in the future it won’t be surprising if they are used as stadium flood lights.
LEDs can be operated through voltages as low as 4 volts with minimum currents not exceeding 10 mA. Amazingly, when these are connected in series for greater illumination, only one parameter, the voltage needs to be increased appropriately for the required proportionate increase in their illumination, the current stays constant at the original level, that is either at 10 mA or 20 mA which was initially used for driving a single LED. This property becomes the unique feature of LEDs and is the main reason why they are so economical with power consumption.
Here we will discuss how to make your own LED light fixture which may be built and used to replace with your home’s age old, inefficient fluorescent tube light fixture.
The proposed design will have the following specifications:
Operating Voltage – 230 VAC or 120 VAC
Current Consumption – 100 mA @ 230 VAC, 200 mA 120 VAC,
Power Consumption – 25 watts,
Luminous Intensity – 7000 × 250 mcd
Circuit Description
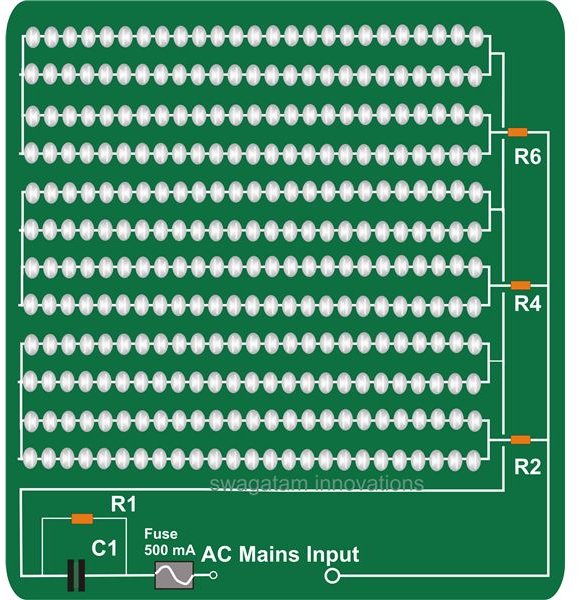
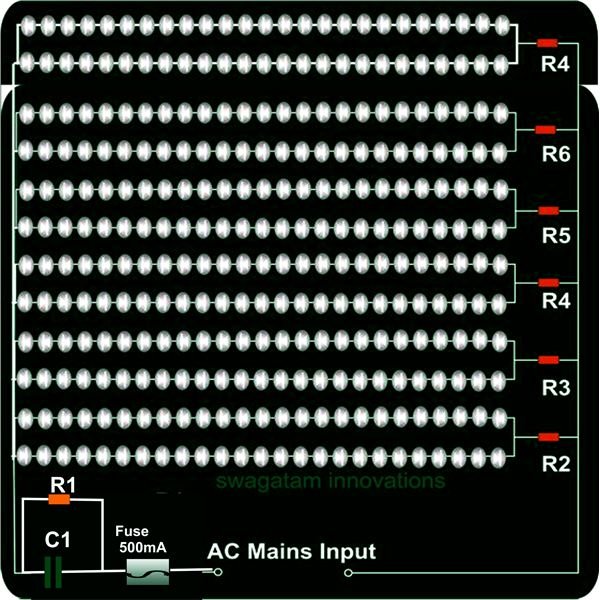
Referring to the figure, a glance shows it to be a rather standard configuration where a capacitive current dropped power supply is incorporated to drive some groups of LEDs. However a careful investigation reveals that the circuit does not include a bridge and a capacitor network, usually employed with power supplys, especially for driving LEDs.
In the present design we have eliminated the DC conversion stage, which simply means the LEDs are being operated at mains potential and at AC levels. The supply here must be essentially AC, and a smart interconnection of the LEDs for the required operations quite justifies the issue.
The diagram shows how each branch has LEDs connected in series and parallel with opposite polarities. Here one series of 25 LEDs (@120 V) remains illuminated during one half cycle of the AC mains input while the other 25 sets of LEDs which are connected with reverse polarity switches with the other opposite half cycle of the AC mains.
It also means that both the channels are never ON together but are alternately switched corresponding to the AC mains 50/60 Hz cycle and due persistence of vision the rapid switching (50/60 times per second) we are not able to spot the flips and the entire LED block appears to be constantly illuminated.
The series resistors with each group have been included to safeguard the LEDs from sudden voltage surges and transients.
Both the diagrams have similar functioning, however the one which is operated at 120 volts include series resistors double the previous number and LED groups proportionately increased by adding them in parallel.
The capacitor at the input ensures safe limit of current so that the LEDs are always subjected to tolerable current levels.
Parts List
LEDs – 5mm, super bright, hi-efficiency, white,
C1 – 205 / 400 V PPC, for 230 V applications, (for 120 V use two 205 / 200 V caps. In parallel, this will equal to 4 µF),
R1 = 1 M, 1/4 W, 5 %, CFR,
R2—-R6 – 100 Ω, rest same as above,
Fuse Holder - Screw type, can be fixed by drilling an appropriate sized hole over the cabinet used for enclosing the circuit part of the unit.
Fuse - 120 V/230 V, 500 mA, glass fuse.
Construction Clues
CAUTION: The circuit is directly coupled to AC mains and may carry lethal mains potentials, extreme care and precaution is advised while constructing and testing the circuit.
The huge number of LEDs involved with the project definitely doesn’t make the use of a PCB a feasible option, especially for fixing the LEDs, so a suitably sized, thin, rigid, water proof and weather proof plywood becomes quite an ideal base for the LEDs. The assembly of the LEDs may be done with the following points:
Drill appropriately sized and spaced holes in arrays over the plywood using a small electric operated drill machine. Preferably, the array alignment must complement the diagram layout.
After this, you may proceed with fixing the LEDs into the drillings, again making sure, the orientation exactly matches the schematic representation.
Next it’s time to interlink the LEDs according to the referred connection from the diagram.
Finally, which is perhaps the easiest part is to make the capacitor, resistor connections and then connecting the completed unit to the mains supply.
Hopefully if everything is done correctly, the unit should light up instantly, producing lights at dazzling levels (do not look directly and from a close range into the lit LEDs, the high intensity may damage your eyes).
Circuit Idea and Images - By Swagatam